

What an amazing experience to start our #TRAVEL2016. We are very very grateful for this blessing.
Tokyo was INTENSE & OVERWHELMING. GRABE! Everything was SUPER amazing!
THE FOOD.
THE CULTURE.
THE PLACE.
THE EXPERIENCES.
THE FAMILY BONDING.
CHECK OUT MY OTHER TRIPS TO JAPAN:
- Osaka – Kyoto – Nara
- Nagoya – Takayama – Shirakawago
- Niseko – Sapporo – Otaru
- Magome – Matsumoto – Toyama – Shirakawago – Takayama – Gujo – Kuwana – Nagoya
- Niseko – Sapporo – Asahikawa – Sounkyo – Biei – Furano – Lake Shikotsu
- Osaka – Kobe – Naruto
- Okinawa – Zamami
- Best Cherry Blossom Spots in & around Tokyo
TOKYO TRAVEL & BUDGET GUIDE + TIPS
(1) CEBU PACIFIC FLIGHT
Our family is very grateful once again to Cebu Pacific as we obtained another great deal for our travels! We paid an estimate of ₱4,700 each for our round trip flight to Tokyo (Narita). We got these tickets during the airline’s seat sale last June 2015 Our travel date was January 2016.
TRAVEL TIPS:
- SIGN UP for mailing lists or newsletters through official airline websites, LIKE airline Facebook pages, and FOLLOW airline Twitter/Instagram accounts to be updated on flight deals and sales!
- When you browse for flights and don’t see the cheap fares, keep refreshing. Also, try booking for one person at a time. BE GRATEFUL that you’ll get that low cost seat and you’ll get that opportunity!
(2) VISA
For our trip to Osaka, we were granted a single entry visa to Japan so for our trip to Tokyo, we had to apply again.
We applied through Reli Tours at SM Megamall. We passed the documents, they checked it, we paid the fee, and left. It took us around 45 minutes as there were more applicants on that day compared to when we applied for our Osaka trip. We got our visa a week later and we’re very grateful to the embassy because they granted us multiple entry visa for 5 years. Grateful for more Japan travels to come!
(3) WHERE TO STAY IN TOKYO: KHAOSAN WORLD ASAKUSA HOSTEL
We found this great hostel through Agoda. No recommendations from family or friends. We based this booking solely on Agoda/Trip Advisor/Hostelworld/Booking.com reviews. We took into account its location, distance from train station, if there is easy airport access, distance from tourist sites, and customer reviews.

At Khaosan World Asakusa Hostel
This was really a great and grateful choice! We really recommend you to consider this accommodation when you’ll stay in Tokyo.
- Airport access station (Asakusa-Toei Line) is a 15 minute walk to/from the hostel. The Narita Sky Access Line (Access Limited Express) takes you from Narita Airport to Asakusa in an hour. No more transfers to other train lines. One way costs ₱503+ (¥1,240).
- The subway (Asakusa-Tsukuba) which can take you to different tourist sites and other train lines is only a 1 minute walk from the hostel.
- The hostel is walking distance to popular Asakusa tourist sites, restaurants, malls, convenience stores, Don Quijote (discount chain store), street foods, and many more.
- Our room for 4 persons (Private Superior Room) was very clean. We had two double deck beds, a sofa bed to put all our clothes on, our own bathroom, and even a small common room with a table and two chairs. There is also an aircon/heater. It was very spacious as well.
- There is free wi-fi, free hot water and green tea, a kitchen where you can cook, utensils that you can use, dining area, sofas, desktops, and Tokyo travel guides at the first floor of the hostel.
- Towel rentals cost ₱20+ (¥50) each.
(4) TRAIN – PASMO CARD
Navigating through the OSAKA train system was fairly easy for me. So when I researched the TOKYO train system, I thought it would be the same. It was very confusing at first. There were so many lines, so many crossovers, and so many names on the map. After more research and experiencing it first hand, I got the hang of understanding it. Tokyo’s train system is just amazing and I’m very grateful that we got to experience it.
We bought the PASMO card at Narita airport. We loaded it with ₱2,028+ (¥5,000) first and just added later on at train stations when we needed to. We used this for airport access, Tokyo metro/subway/private railways and even the Disney Resort line. We used the card for ALL our train rides. There was no hassle in buying a ticket per route, it was very convenient.

Get your PASMO card here at Narita Airport Terminal 2
Having an itinerary established beforehand, we studied directions of train routes through Rome2Rio.
TOKYO TRAINS WERE AMAZING. GRABE! SOBRANG EFFICIENT! Riding the TOKYO trains is really an experience in itself, an experience of efficient transportation and disciplined Japanese culture. On our first morning of riding the trains, we were so OVERWHELMED. The train was packed and EVERYONE WAS SO QUIET. No one was speaking. SUPER DEAD AIR!

At Tokyo Station
We rode, stepped off, and transferred on rush hour train stations – Akihabara and Tokyo. IT WAS ALL A BLUR. Almost everyone was wearing black coats/suits/dresses, walking fast in every direction possible, and we were in the middle of it dressed in light colors of beige, green, red, and white. We felt like we were in a movie.
Having been accustomed to always STAYING ON THE RIGHT on escalators or stairs for slow paced commute in the Philippines, we stayed on the right most of the time. SOBRANG MALI…HAHAHA… In Tokyo, it’s the opposite. If you want to slow down, you stay on the left.
When you’re in a hurry, stay on the right. WE WERE ON THE RIGHT MOST OF THE TIME, AND BEING SUPER OVERWHELMED, we just followed the crowd. MEDYO NAG JOGGING KAMI, SOBRANG BILIS NA LAKAD, PARANG MGA ISDA NA SUMUSUNOD SA MADAMING ISDA. PARANG NADADALA NALANG KAMI. The feeling was so intense and overwhelming. GRABE! But a very grateful experience of culture! SOBRANG GALING AND SOBRANG SAYA!
BEST TRAIN: Yurikamome Line was the best train that we rode. It felt like a business class train with an amazing view of the city.
TRAVEL TIPS:
- Stay on the left for slow paced commute!
- There are a lot of convenience stores, restaurants, and food stalls at Tokyo Station. Buy food there if you’re transferring through that station.
- You can return the PASMO card at train stations and any amount left minus the ₱81+ (¥200) card fee will be returned.
- Be prepared as train fares going around the city of Tokyo are expensive. Rides cost us as low as ₱60+ (¥150) and at most ₱160+ (¥400). Yurikamome and Disney Resort lines have relatively more expensive fares than other train lines.
- Trains operate between 5am to 1am. The rush hour we experienced in the morning was around 7:00 am at Akihabara and Tokyo stations. The latest train ride that we took was around 9:30 pm.
(5) FOOD
What can I say? It’s JAPANESE FOOD IN JAPAN. Of course, it was amazing! Food in Tokyo is relatively more expensive than Osaka. Our family though was already content buying food at convenience stores (7 eleven, Mini Stop, Lawson). We would buy stocks of Onigiris, Gyozas, and other packed meals. On an average, all of our items would cost ₱600 (¥1,480) per transaction. We would also buy street food that costs less than ₱400 (¥1,000) and that’s for all 4 of us already.

Japanese Fooooooood!
The most expensive food that we bought was at Disney Sea and Tsukiji Fish Market. At most, we spent around ₱1,500+ (¥3,780) per person for one meal.
Disney Sea snacks and meals are twice as expensive or thrice even than food outside of the resort.
For the ILOHAS water alone (BEST WATER IN THE WORLD-SUPER GRATEFUL FOR THIS WATER), this is the costing:
|
ILOHAS WATER |
Don Quijote (Discount Chain Store) | Convenience Store | Disney Sea Resort |
| PRICE | ₱34+ (¥85) | ₱49+ (¥120) | ₱85+ (¥210) |
TRAVEL TIPS:
- Bring your passport. While buying items in stores, check if they are a tax free shop. If you have a passport, you’ll get an 8% tax refund.
- When eating at sushi restaurants or sushi conveyor belts, expect that the sushi will have wasabi. If you don’t like wasabi, you can ask if they can be removed.
- Buy items at discount chain stores like Don Quijote or Daiso stores.
- Buy Royce chocolates at the airport as gift items, the price here in the Philippines is twice or thrice higher than in Japan.
- Eat at Daiwa Tsukiji Fish Market, Yoshinoya at Shibuya, and Blue Sky Miso Kitchen at Narita Terminal 2

YAY! Sushi Conveyor Belt!
(6) WEATHER
Travel period: January 2016
Since our trip was during one of the coldest months in Tokyo, we really needed to prepare. After our experience in South Korea of negative degrees, we borrowed and bought clothes that would help us endure the weather. The temperature in Japan is very cold but not colder than South Korea. But it was still very cold. During our stay, average temperature was between 2 to 13 degrees.
TRAVEL TIPS:
- Before going out, put moisturizer or lotion or petroleum jelly on your face and lips to avoid cold or wind burns. My mom and sisters did this but I didn’t. My face and lips hurt a lot after! It stung a lot. I felt like I had sunburn.
- At Tokyo Station and Asakusa streets, there are stalls that sell fashionable boots at ₱405+ (¥1,000). There are also scarves, gloves, and socks at ₱40+ (¥100)
- Always check Accuweather for updates on the temp
EXPLORING AND EXPERIENCING TOKYO (THINGS TO DO IN TOKYO)
There are so many sights to see and things to do in Tokyo. Since we only had 2 and a half days to explore this awesome city, we really had to maximize it.
TOKYO ITINERARY
| DAY 1 | DAY 2 | DAY 3 | DAY 4 |
| Narita Airport Arrival
Asakusa Streets Sensoji Temple Nakamise Street |
Tokyo Disney Sea | Tsukiji Fish Market
Odaiba Shibuya Harajuku |
Narita Airport Shopping & Lunch
Narita Airport Departure |
(1) AROUND ASAKUSA
We were lucky enough to book an accommodation that was conveniently located. Khaosan World Asakusa hostel was within walking distance to many popular tourist sites, discount stores and shops, restaurants, street food, malls, and convenience stores.

Food Stalls Around Asakusa
SENSO-JI TEMPLE

NAKAMISE FOOD STREET


Exploring the streets of Asakusa
(2) DISNEY SEA

The Happiest Place On Earth! 😉
How We Got To Disney Sea from Khaosan World Asakusa Hostel By Train: Asakusa (Tsukuba) – Akihabara (JR Yamanote Line) – Tokyo (JR Keiyo Musashino Line) – Maihama
DISNEY SEA THEME PARK


BEST RIDE: TOY STORY MANIA

Line to Toy Story Mania FASTPASS at 9:30AM

Andy’s BIG Door

Toy Story Mania!!! 🙂
TRAVEL TIPS:
- We were there during the week of the “Sweet Duffy” event. Even though we went on the weekday with the lowest expected turnout, ANG DAMI PARING TAO! ANG HABA PA RIN NG MGA PILA! Average wait for some rides without fast passes were 50 minutes. If that was what they called a “low turnout”, I’d be afraid to see what “high turnout” or weekend crowds are like. For crowd turnout in Disney theme parks, check TDRNAVI
- Arrive 30 minutes to 1 hour before the park opens so you can buy tickets and will be able to get early Fast Passes
- Toy Story Mania is the most popular ride in Tokyo Disney Sea, once the theme parks opens, head straight to American Waterfront and get your fast pass. We arrived at around 9:30am, bought our ticket, and headed straight to that attraction. We saw the LONG LINE, waited for 40 minutes, and got a fast pass for 7:15PM
- Almost ALL shows are presented in JAPANESE. If English was used, KONTI LANG. Songs, dialogue are in JAPANESE. Best shows for our family are THE BIG BAND BEAT (most English presented show), KING TRITON’S CONCERT, AND FANTASMIC (Don’t miss Fantasmic, I swear!)
- Plan ahead! Know what you want to do beforehand. Because when you see the flyer, you’ll just be overwhelmed. Know what shows you want to watch, rides you want to experience, food you want to eat, places you want to take pictures in. One day is really not enough for every thing that Disney Sea has to offer.

BEST SHOW: FANTASMIC!
DISNEY SEA FOOD

Snacks at Disney Sea
TRAVEL TIPS:
- Before heading to Disney Sea, buy water and snacks at convenience stores. Stuff your bag with Onigiris, packed meals, water, and others. TAKE NOTE: Food from outside the resort is not allowed. We bought a few snacks just in case and hoped the resort would allow it.
- Buy snacks at stalls around the park instead of meals at restaurants. They’re much cheaper. BEST SNACKS: Smoked Chicken at Lost River Delta! This is a must try! By far, the best chicken in the world! My sisters loved the Milk Chocolate Popcorn and Alien Head Dumplings at American Waterfront, so try that too!
- Water at the park is expensive so bring empty water bottles. There are water fountains around the park where you can refill your bottles.
(3) TSUKIJI FISH MARKET
How We Got To Tsukiji Fish Market from Khaosan World Asakusa Hostel By Train: Asakusa (Tsukuba) – Shin Okachimachi (Toei Subway Oedo) – Tsukijishijo


WE ATE THE FRESHEST SUSHI EVER IN OUR LIVES! We loved our experience at Daiwa Sushi. My mom almost cried SA SOBRANG SARAP NG SUSHI. The Sushi flavors just exploded in my mouth. The taste was heavenly. SOBRANG SARAP. It was really a #FOODGASM moment. Daiwa Sushi is one of the most popular Sushi Bars in Tsukiji Fish Market. There is already a fixed set meal worth ₱1,500+ (¥3,780) per person. This is the most expensive meal we had in Tokyo.

BEST SUSHI EVER!
TRAVEL TIPS:
- Try to go early because popular Sushi bars like Sushi Dai, Daiwa Sushi, Sushi Zanmai tend to have long lines. According to blogs, average wait is two to four hours. We were there at 7:30am and we waited for 40 minutes before we had our turn at Daiwa Sushi.
- Be mindful of your surroundings. It’s a wet market so a lot of operations are on-going. Watch out for fast carts going around the place while you cross streets.
- BUY WHITE STRAWBERRIES (if in season). IT’S THE BEST! 🙂 Don’t buy fruits near the restaurants/sushi bars where all the tourists are because prices are higher there. Go to the produce area where fruits and vegetables are cheaper.
(4) ODAIBA
How We Got To Odaiba from Tsukiji Fish Market By Train: 15 minutes Walk from Tsukiji Fish Market to Shiodome Station (Yurikamome Line) – Daiba

Statue of Liberty At Odaiba
THIS IS MY FAVORITE PLACE. The view was just so amazing! The view of the statue of liberty, the rainbow bridge, and the river plus the skyline of Tokyo…SOBRANG GANDA!

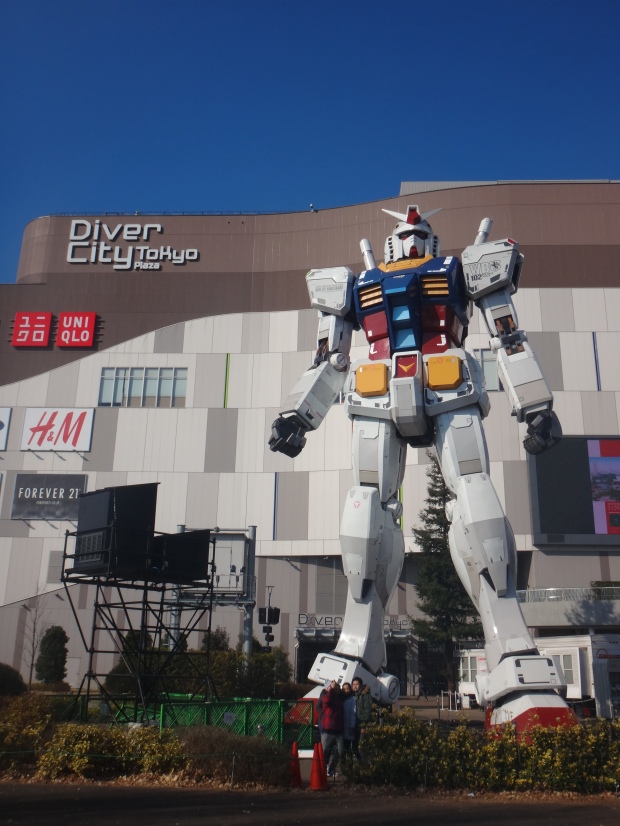
Gundam at Diver City Tokyo Plaza
(5) SHIBUYA
How We Got To Shibuya from Odaiba By Train: Daiba (Yurikamome Line) – Shimbaishi (Tokyo Metro Ginza) – Shibuya

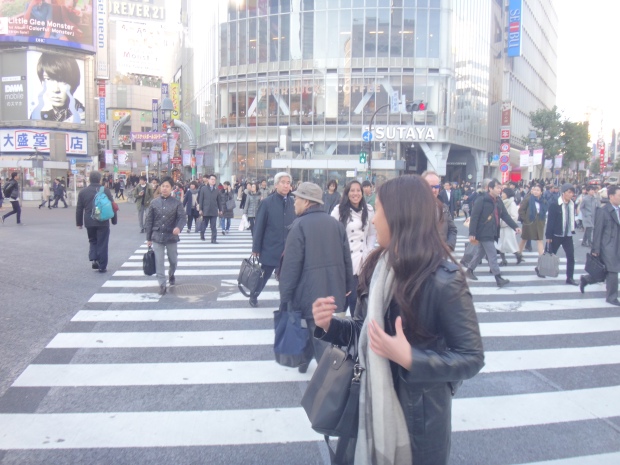
Shibuya! Ah Ah! Shibuya! Roll Call! 😉
Shibuya was really fun! We were excited to see this because it’s one of the most featured places of Japan in movies. We really had a wonderful time here! We crossed the street so many times while taking videos and pictures. And we were not the only ones doing this! Other tourists were as well! There was even a dinosaur mascot disrupting tourists taking videos and pictures. HAHAHA! Really fun!

Ina with Hachiko 🙂
There were a lot of people taking pictures with the Hachiko statue as well.
Having fun crossing the street!
(6) MEIJI SHRINE & TAKESHITA STREET
We walked 20 minutes from Shibuya to reach the Meiji Shrine and Takeshita Street. It was a very scenic walk. Since we were so tired we just took a picture in front of Meiji Shrine, we didn’t have the energy to explore the whole park. The ambience was peaceful and really beautiful.

Mommy in front of Meiji Shrine. We know LOLA would have loved to explore this place.
Takeshita Street is a very busy street. But one thing you’ll find: CREPES. Lots of stalls of CREPES! And the crepes are very yummy! There are also lots of discount chain stores and tax free shops. There is also free wi-fi at the McDonald’s at the start of the street.

Busy Takeshita Street
How We Got To Khaosan World Asakusa Hostel from Takeshita Street By Train: Harajuku (JR Yamanote Line) – Akihabara – Asakusa (Tsukuba)
AMAZING TOKYO
As intense and overwhelming as Tokyo was, it wouldn’t have been as amazing if it wasn’t for my family. Work, friends, special people tend to cause less family time but travels like these reconnect us in so many meaningful ways.
I had such a grateful time bonding and laughing with my sisters and mom. We got lost. We fought at times. We laughed like crazy people. And many more! We did all these TOGETHER. Tokyo was one of our bests! And we will forever cherish this experience.
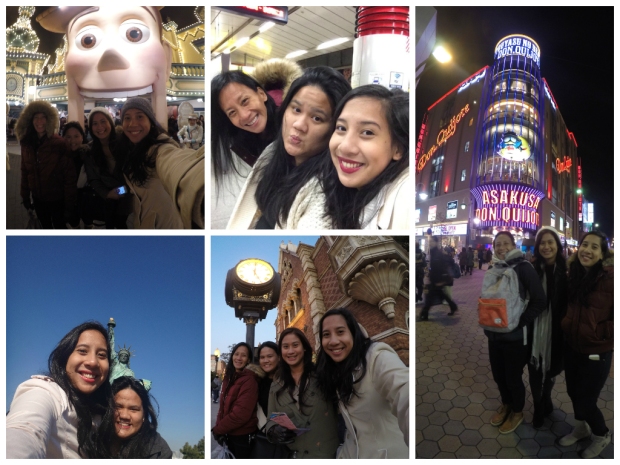
Family that travels together is grateful together 😉
What I loved about us is that we’re very grateful. After each day in Tokyo, while preparing to rest, we say THANK YOU. One of my sisters would say, Thanks for today guys! We say thank you to our mom, we say thank you to each other. We are grateful for the moments we experienced together.
We appreciate the blessings we received. We pray before we eat our food. We hug each other. We hold hands. We say I love you to our mom. We show gratitude in the most simplest of ways in the most blessed of times.
Never forget to show love.
Never forget to appreciate.
Never forget to pray.
Always Be Grateful!
TOKYO BUDGET GUIDE
|
I am very grateful for the money my family spent for these travel blessings and experiences (Amount is for 1 person) |
|
| Roundtrip Cebu Pacific Flight to Narita (Includes NAIA Terminal Fee, Japan Airport Fees, 20kg Check in Baggage) | ₱4,695.99 |
| Visa Processing Fee | ₱950 |
| Travel Tax | ₱1,620 |
| Accommodation – Khaosan World Asakusa Hostel (3 nights) | ₱4,492.12 |
| Train – Pasmo Card (Roundtrip Airport Access, Tokyo Metro/Subway/Private Railways, Disney Resort Line) | ₱2,248+ |
| Disney Sea 1 Day Passport | ₱2,822+ |
| Food & Miscellaneous Expenses | ₱7,500+ |
| TOTAL EXPENSES | ₱24,500+ |


Hi. Is it more cheaper to buy disney sea tickets in there than in klook?
LikeLike
It is better to book in advance via Klook or KKday 🙂 Yes, it’s cheaper.
LikeLike
Hi ms Irene. ask ko lang po paano po kayo nabigyan ng 5 years multiple entry? need po b n pabalik-balik po ng japan? thanks po.
LikeLike
I super love your blog. Feeling ko para na rin ako nasa Japan. I love to travel but due to health constraints medyo limited na. Kaya I enjoy so much reading your travel adventure. Keep it my dear😘😘😘
LikeLike
Hi Vicky! Thank you so much for your comment! 🙂 I’m glad that you enjoy my articles 🙂 I’ll pray for your health 🙂 Fight & always be grateful! 😉
LikeLike
Hi! Please read my OSAKA & TOKYO blogs to know my visa application experiences. Thank you! 🙂
LikeLike
Hi Ms. Irene! I’m planning to visit Japan next year for the first time. Ask ko lang yung mga Itinerary nyo ba DIY lang or Package tour? tsaka mas maganda bang magpabook na ako ng Flight at accomodation bago kumuha ng Visa? 🙂
LikeLike
Sobrang drama. That visa officer shouldn’t have given multiple entry visas. I hate seeing such crowds of Filipinos who are often arrogant, noisy and incredibly condescending . Then they go online and brag endlessly about the travel exploits with that typical Filipino fakeness. I can’t be grateful enough for having a Swedish father and thus the opportunity to distance myself from Asia’s notorious source of overstayers and exploitative travelers.
LikeLike
Hello. How about the language barrier? How did you cope up with this?
LikeLike
Hi Irene! Your tips and advice help me out a lot! Thank you for always sharing your travels. I am planning a trip to tokyo in June. I was wondering how you got your hotel/airport transfers?
LikeLike
Hi Annie! Thanks for the kind words 🙂 Airport transfer – We used the PASMO card 🙂 We rode the Narita Express Train to Asakusa station (where our hostel was near).
LikeLike
very helpful and generous with the info.. thank you and God bless..
LikeLike
Loved this post. Reminds me of my first Tokyo trip. 🙂
One more Tokyo transpo trick I would like to share aside from using Suica/Pasmo cards since these are charged based on the almost exact train fare itself (IC cards usually get 10/20 yen discount from the published fares)
As tourists, we are entitled to the unlimited Tokyo subway tickets which we can use to navigate all the subway train lines in Tokyo (Tokyo Metro and Toei lines). The only caveat is you cannot use it for JR lines and Yurikamome line to Odaiba but that’s not really much of a problem since every tourist spot in Tokyo has definitely a subway station near it. You just have to plan your itinerary to know which subway station you’re going. I always use it in combination with a discount rountrip Keisei skyliner ticket from Narita but you can also buy it in BIC Camera shops around Tokyo.
http://www.keisei.co.jp/keisei/tetudou/skyliner/us/value_ticket/subway.php
LikeLike
Hi again 🙂 hehehe. Tgalog nlng hahaha. Ung travel tax mo? San k ngbyd nun? 🙂
LikeLike
Hi Kae 🙂 Travel tax is paid at the airport before you check in at your airline. Just ask guards or personnel where you’ll pay the travel tax.
LikeLike
Im going to japan also . This coming feb 25 🙂 pls help me. I dont have any idea in the transportation in japan. 🙂 thankyou.
LikeLike
Hi Kae! 🙂 All info you need is above 🙂 Links to sites you can use, what we did, train routes we took 🙂 Just study those and do more research, you’ll be fine 🙂
LikeLike
Hi. Where did you get your ticket in disney sea? F only 2k+ ? Thats incredible.
LikeLike
Hi Kae 🙂 We bought directly at the DisneySea ticketing booth 🙂
LikeLike
About that. Did you avail the after 6 passport? As i search there is no more price as you got. 🙂
LikeLike
Hi Kae 🙂 If you check the Disney Sea website A full 1 day passport costs 6,900 YEN http://www.tokyodisneyresort.jp/en/ticket/ If you convert that to Philippine Peso, that’s around P2,800+ (depends on exchange rate)
LikeLike
Japan for 24K!? It almost sounds impossible! Guess I have to (really) watch out for that promo fare! Lucky you!!
LikeLike
Hi Louisse! Thanks 🙂 It’s not impossible! 🙂 Others have spent less! They said the airfare could go as low as P3,500 🙂
LikeLike